

How to Spot Local Surf Hazards Before You Paddle Out

TL;DR:
Identifying local surf hazards involves observing water conditions and checking signs before entering the ocean.
Proper shore observation, communication with locals, and understanding visual cues are essential for safety.
Spotting local surf hazards means reading the water, beach, and environment from shore to identify dangers before you enter the ocean. Rip currents alone account for over 100 deaths per year in the U.S. and are the leading cause of surf lifeguard emergencies. That number reflects a hard truth: most surf accidents are preventable with the right observation skills. Whether you are a first-timer at Praia Areia Branca or a seasoned surfer visiting a new break, knowing how to spot local surf hazards is the single most important skill you can develop before touching the water.
What are the common local surf hazards and their visible signs?
Rip currents are the most dangerous and most misread hazard on any surf beach. Visual signs of rip currents include darker water channels, flat or choppy patches between breaking waves, foam and debris moving offshore, and clear gaps where waves stop breaking. These signs cluster together, and spotting two or more of them in the same area is a strong indicator of a rip. From an elevated position on the beach, they become much easier to read.
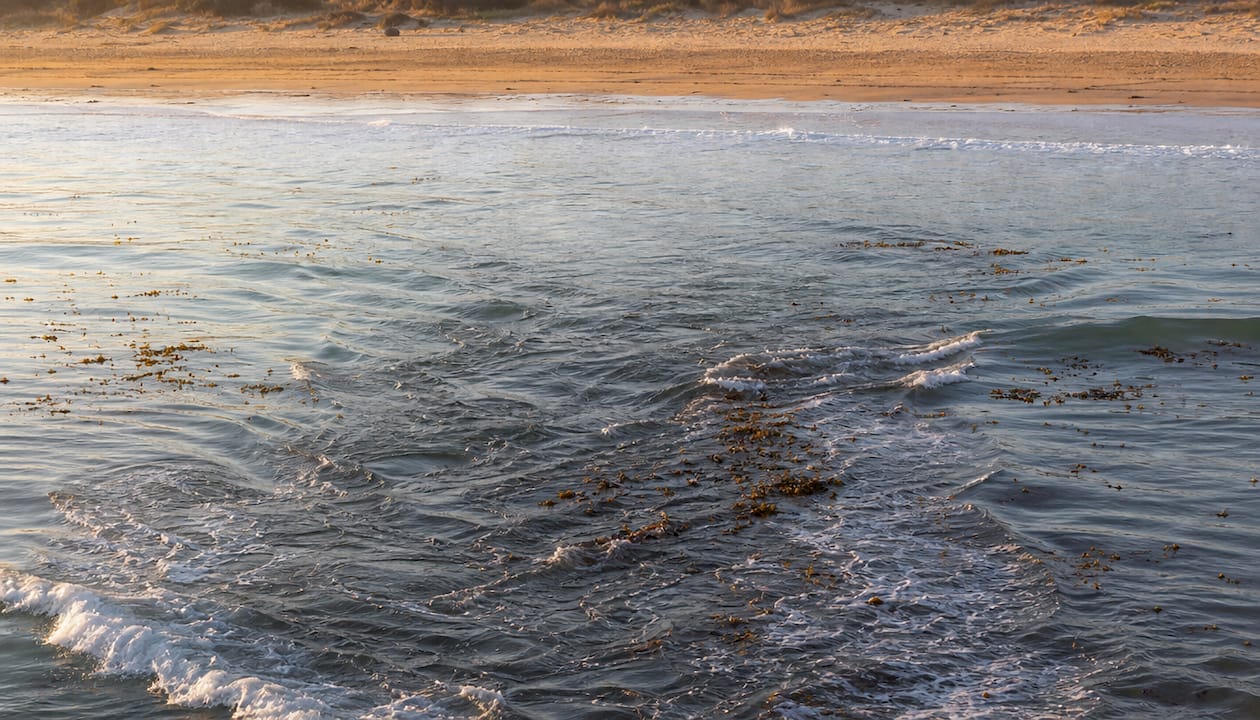
Shore breaks are a separate and underestimated hazard. A shore break is a wave that breaks directly onto the sand with little or no water beneath it. These waves are most dangerous at low tide, when the water is shallow and the force of the wave drives straight into the bottom. Tidal currents and shore breaks vary significantly with tide state, so a beach that looks safe at high tide can become dangerous within hours.
Submerged hazards like reefs, rocks, and jetties reveal themselves through wave behavior. Waves that break suddenly in an unexpected location, or that create a boiling, churning surface after breaking, often indicate something solid beneath the surface. Discolored water, particularly brown or greenish patches in an otherwise blue ocean, points to shallow reef or rock. Jetties and breakwaters are usually visible, but their submerged extensions are not.
Hazardous marine life and environmental warnings also fall under local surf hazard awareness. Posted signs at the beach entrance are the fastest way to check for jellyfish blooms, shark activity, or water quality issues. Colored flag systems used by lifeguards communicate current danger levels at a glance:
Red flag: High surf or dangerous conditions. Do not enter the water.
Yellow flag: Moderate hazard. Swim and surf with caution.
Green flag: Low hazard. Conditions are generally safe.
Purple flag: Marine life present, such as jellyfish or dangerous fish.
Double red flag: Water closed to the public.
Reading the flag system takes seconds and gives you an immediate baseline for local surf safety before you observe anything else.
How do you perform a proper pre-surf observation from shore?
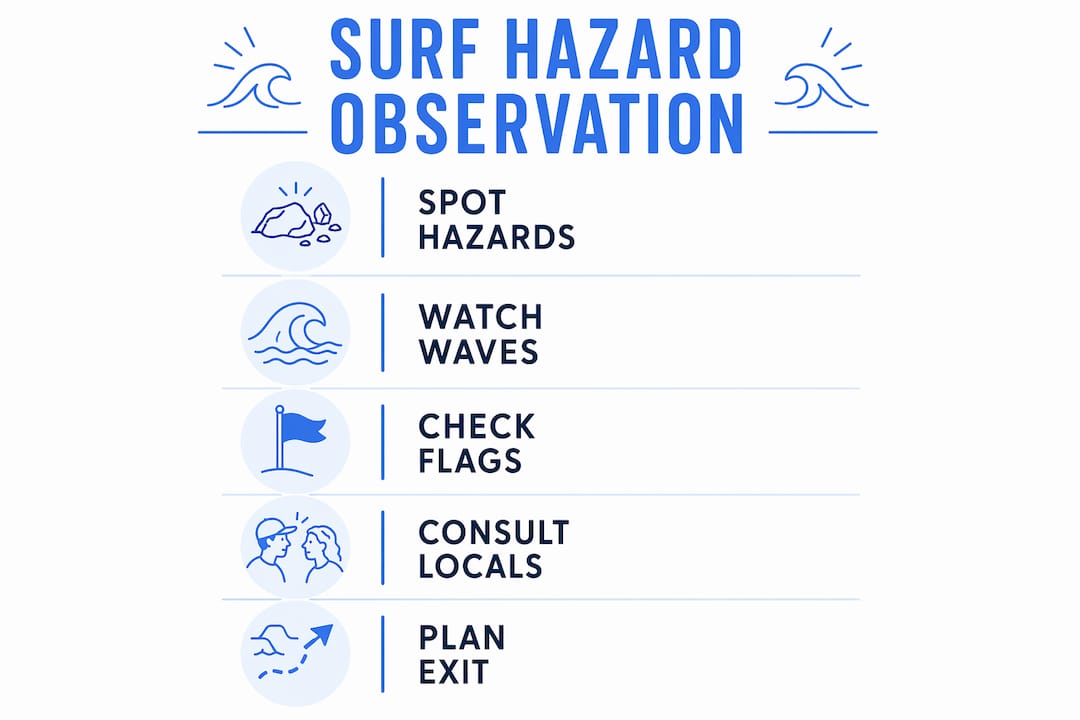
A structured observation period is the most reliable tool for identifying surf dangers before you paddle out. Spending 60 seconds to 5 minutes watching from an elevated vantage point, such as a dune, a seawall, or a raised section of beach, gives you a full picture of the surf zone. That time investment costs nothing and can prevent a serious incident.
Follow this sequence every time you arrive at a new break:
Find an elevated spot. Height gives you a wider angle on the water and makes rip channels, wave gaps, and submerged hazards far easier to see.
Scan left to right along the surf line. Start at one end of the beach and work methodically across. Look for consistent patterns in where waves break and where they do not.
Track foam, debris, and floating objects. Watch which direction they move. Foam or kelp moving steadily away from shore signals a current pulling water offshore.
Identify where waves break and where they do not. Gaps in the breaking wave pattern are the clearest sign of a rip channel.
Check posted signs and flag warnings. Walk to the lifeguard station or posted advisory board before entering the water. Flags and signs reflect real-time conditions that no forecast can fully capture.
Note entry and exit points. Identify a safe spot to enter and a clear path back to shore before you go in. A solid ocean safety checklist helps you stay systematic at unfamiliar breaks.
Pro Tip: Watch a set of waves all the way through before you move. One set rarely tells the full story. Wait for at least two or three sets to pass so you can see how the break behaves under different wave sizes.
How to interpret hazard signs and respond safely
Discolored water and wave gaps are not just visual curiosities. They are direct signals that the ocean is moving water in a specific direction, and that direction may not be the one you want. A dark channel flanked by white breaking waves on both sides is almost certainly a rip current. The white water breaks because the water is shallow enough. The dark channel stays calm because the water is deeper and moving fast.
When you spot a rip current from shore, the correct response is to avoid that entry point entirely and choose a spot where waves are breaking consistently. If you are already in the water and get caught in a rip, the United States Lifesaving Association is clear on the correct action:
Do not fight the current. Swim parallel to shore until you are out of the rip channel, then angle back toward the beach at a diagonal. If you are tired, float on your back, conserve energy, and signal for help by raising one arm.
Shore breaks require a different response. If you see waves dumping hard onto dry sand with no gradual slope, that beach section is not a safe entry point. Walk along the shore until you find a spot where waves are breaking further out and the water has depth. Entering through a shore break at low tide is one of the most common causes of surfing head and neck injuries.
A few key behaviors to follow when you identify any hazard:
Never enter the water at a hazard point. Move laterally along the beach to find a safer entry.
Tell someone where you are going. A buddy on shore who knows your plan can call for help if needed.
Wear appropriate gear. A leash keeps your board close after a wipeout. In cold water, a wetsuit prevents hypothermia and extends your ability to stay calm and float.
Protect your head after a wipeout. Cover your head with both arms when surfacing after a fall, especially over shallow reef or rock.
Why does local knowledge matter for recognizing ocean risks?
Surfing in unfamiliar locations with unknown hazards significantly increases the risk of injury and drowning. Forecasts and surf apps give you swell height and wind direction. They do not tell you about the submerged rock that only appears at low tide, the flash rip that forms on the south end of the beach after a big set, or the section of reef that locals avoid on incoming tides. That information lives with the people who surf the spot regularly.
Local knowledge from experienced surfers reveals spot-specific hazards that are invisible in general observation or forecasts. A two-minute conversation with a local surfer or a lifeguard before your session can give you more useful safety information than an hour of reading online. Ask direct questions: Where do rip currents form here? Are there rocks or reef sections to avoid? What does the tide do to this break? Is there a better entry point at this tide level?
Lifeguards are an underused resource. They patrol specific sections of beach, know the hazard history of their zone, and can tell you exactly where incidents have occurred. Checking in with them is not a sign of inexperience. It is a sign of good judgment. The habits of skilled surfers always include asking questions before paddling out at a new spot.
Pro Tip: Do not rely solely on surf forecast apps for hazard information. Apps model wave height and period well, but they cannot model the specific geography of a local break. Treat app data as a starting point, not a final answer.
Key Takeaways
Spotting local surf hazards requires a combination of structured shore observation, knowledge of visual cues like rip channels and wave gaps, and direct communication with locals and lifeguards before entering the water.
Point | Details |
Observe before entering | Spend 60 seconds to 5 minutes watching from an elevated spot to identify rip channels and wave patterns. |
Read rip current signs | Look for dark water channels, gaps in breaking waves, and foam moving offshore as clear rip indicators. |
Use the flag system | Check beach flags every session; red and purple flags signal conditions that require you to stay out. |
Ask locals and lifeguards | A short conversation reveals spot-specific hazards that no forecast or app can show you. |
Respond correctly to rips | Swim parallel to shore, not against the current, and signal for help if you need it. |
What I have learned from years of watching surfers get it wrong
The most common mistake I see is not ignorance. It is impatience. Surfers arrive at the beach, see good waves, and walk straight into the water without spending even thirty seconds looking at the conditions. They skip the observation step because the surf looks fine from the parking lot. The parking lot is not the ocean.
The second mistake is treating hazard spotting as a beginner skill. Experienced surfers make this error more than beginners do. They assume their experience transfers to every beach. It does not. A surfer with ten years at a point break in Portugal may have zero instinct for a beach break with a shifting rip in a different country. Surfing solo at an unfamiliar spot compounds this problem significantly. A buddy sees what you cannot see from the water.
The habit I recommend to every surfer I work with is simple: treat every new beach as if you have never surfed before. Observe, ask, check the flags, identify your entry and exit, and then go. That sequence takes five minutes at most. It has prevented more incidents than any piece of gear or physical skill I can name. Patience before the session is what separates surfers who stay safe from those who do not.
— Fernando
Surf safely with Riparsurfschool in Portugal
Riparsurfschool has been teaching surfers to read the ocean safely at Praia Areia Branca since 2001. Every lesson covers hazard spotting as a core skill, not an afterthought.

Riparsurfschool’s certified local instructors know the specific conditions, tides, and hazard patterns of the Portuguese coast in detail. That knowledge goes directly into every session, whether you choose a group surf lesson with other learners or a private lesson focused on your individual needs. You learn to observe, identify risks, and enter the water with confidence. Ready to get started? Book your lesson and surf with people who know this coast.
FAQ
What are the main visual signs of a rip current?
The clearest signs are a dark water channel between breaking waves, foam or debris moving steadily offshore, and a gap where waves stop breaking. Spotting two or more of these signs in the same area confirms a rip current is present.
How long should you observe the surf before entering the water?
Spend at least 60 seconds and ideally up to 5 minutes watching from an elevated position on the beach. This gives you enough time to see multiple wave sets and identify consistent hazard patterns.
What should you do if you get caught in a rip current?
Do not swim against the current. Swim parallel to the shore until you exit the rip channel, then angle back to the beach. If you are exhausted, float on your back and signal for help by raising one arm.
Why is local knowledge important for surf hazard awareness?
Locals and lifeguards know spot-specific hazards like flash rips, shallow reef sections, and tide-dependent dangers that forecasts and apps cannot show. A short conversation before your session can prevent a serious incident.
Is it safe to surf alone at an unfamiliar beach?
Surfing solo at an unfamiliar location significantly increases risk. A buddy can monitor conditions from the water and respond if you get into difficulty. If no buddy is available, inform a lifeguard or someone on shore of your plans before paddling out.
Recommended
Comments